Directory
Database migration with Flask-Migrate
Flask migrate permet de traquer les changements faits aux bases de données. Entre autres il est particulièrement utile pour ajouter des colones à une table. Le workflow est le suivant:
- Création d’une base de donnée
- Initialisation du fichier qui contient les scripts de migration
- Commit initial de la base de données et début du tracking des modifications
- Modification des tables
- Mise à jour de la base de données
- Création des nouvelles tables
- Import des données contenues dans les anciennes tables
Créer le fichier qui contient les scripts de migration:
python manage.py db init
Une fois des changements faits dans les classes qui représentent les tables:
python manage.py db migrate -m"explication"
Pour appliquer les changements à la current DB:
pyhton manage.py db upgrade
Advanced Database Relationship
Many to many (with association table)
Consider the classical example of a many-to-many relationship: a database of students and the classes they are taking. Clearly, you can’t add a foreign key to a class in the students table, because a student takes many classes—one foreign key is not enough. Likewise, you cannot add a foreign key to the student in the classes table, because classes have more than one student. Both sides need a list of foreign keys.
The solution is to add a third table to the database, called an association table. Now the many-to-many relationship can be decomposed into two one-to-many relationships from each of the two original tables to the association table. Next picture shows how the many-to-many relationship between students and classes is represented.

The association table in this example is called registrations . Each row in this table
represents an individual registration of a student in a class.
Querying a many-to-many relationship is a two-step process. To obtain the list of classes
a student is taking, you start from the one-to-many relationship between students and
registrations and get the list of registrations for the desired student. Then the one-to-
many relationship between classes and registrations is traversed in the many-to-one
direction to obtain all the classes associated with the registrations retrieved for the stu‐
dent. Likewise, to find all the students in a class, you start from the class and get a list
of registrations, then get the students linked to those registrations.
Traversing two relationships to obtain query results sounds difficult, but for a simple relationship like the one in the previous example, SQLAlchemy does most of the work. Following is the code that represents the many-to-many relationship:
registrations = db.Table('registrations',
    db.Column('student_id', db.Integer, db.ForeignKey('students.id')),
    db.Column('class_id', db.Integer, db.ForeignKey('classes.id'))
)

class Student(db.Model):
    id = db.Column(db.Integer, primary_key=True)
    name = db.Column(db.String)
    classes = db.relationship('Class',
                              secondary=registrations,
                              backref=db.backref('students', lazy='dynamic'),
                              lazy='dynamic')

class Class(db.Model):
    id = db.Column(db.Integer, primary_key = True)
    name = db.Column(db.String)
The relationship is defined with the same db.relationship() construct that is used for one-to-many relationships, but in the case of a many-to-many relationship the addi‐ tional secondary argument must to be set to the association table. The relationship can be defined in either one of the two classes, with the backref argument taking care of exposing the relationship from the other side as well. The association table is defined as a simple table, not as a model, since SQLAlchemy manages this table internally.
The classes relationship uses list semantics, which makes working with a many-to- many relationships configured in this way extremely easy. Given a student s and a class c , the code that registers the student for the class is:
>>> s.classes.append(c)
>>> db.session.add(s)
The queries that list the classes student s is registered for and the list of students regis‐ tered for class c are also very simple:
>>> s.classes.all()
>>> c.students.all()
The students relationship available in the Class model is the one defined in the db.backref() argument. Note that in this relationship the backref argument was ex‐ panded to also have a lazy = ‘dynamic’ attribute, so both sides return a query that can accept additional filters.
If student s later decides to drop class c , you can update the database as follows:
>>> s.classes.remove(c)
Database representation of Comments
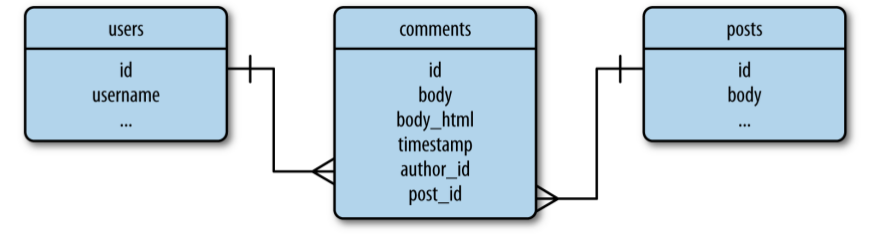
Un commentaire est lié à un poste spécifique et correspond à la relation “One-to-many” à partir de la table posts. Un poste a (peut avoir) de nombreux commentaires. Cette relation peut être utilisée pour obtenir la liste des commentaires associés à un poste en particulier.
La table comments a également une relation “One-to-many” avec la table users. Cette relation donne acces à tous les commentaires faits par un utilisateur et indirectement au nombre de commentaires faits par un utilisateur, une information interessante à montrer dans le profile utilisateur. Le snipet suivant montre l’implémentation de la table comments avec SQLAlchemy:
class Comments(db.Model):
    __tablename__ = 'comments'
    id        = db.Column(db.Integer, primary_key=True)
    body      = db.Column(db.Text)
    body_html = db.Column(db.Text)
    timestamp = db.Column(db.DateTime, index=True, default=datetime.utcnow)
    disabled  = db.Column(db.Boolean)
    author_id = db.Column(db.Integer, db.ForeignKey('users.id'))
    post_id   = db.Column(db.Integer, db.ForeignKey('posts.id'))

    @staticmethod
    def on_changed_body(target, value, oldvalue, initiator):
        allowed_tags = ['a', 'abbr', 'acronym', 'b',
                        'code', 'em', 'i', 'strong']
        target.body_html = beach.linkify(bleach.clean(
            markdown(value, output_format='html'),
            tags=allowed_tags, strip=True))

db.event.listen(Comment.body, 'set', Comment.on_changed_body)
Self-Referential Many-to-Many Relationship
A many-to-many relationship can be used to model users following other users, but there is a problem. In the example of students and classes, there were two very clearly defined entities linked together by the association table. However, to represent users following other users, it is just users—there is no second entity.
A relationship in which both sides belong to the same table is said to be self- referential. In this case the entities on the left side of the relationship are users, which can be called the “followers.” The entities on the right side are also users, but these are the “followed” users. Conceptually, self-referential relationships are no different than regular relationships, but they are harder to think about. Next picture shows a database diagram for a self-referential relationship that represents users following other users.
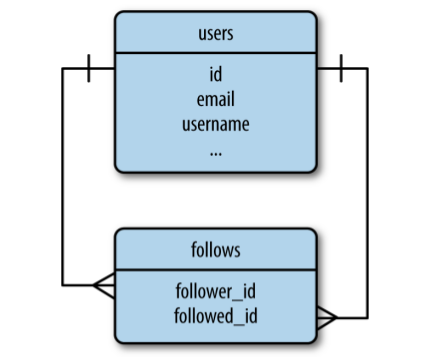
The association table in this case is called follows . Each row in this table represents a user following another user. The one-to-many relationship pictured on the left side associates users with the list of “follows” rows in which they are the followers. The one- to-many relationship pictured on the right side associates users with the list of “follows” rows in which they are the followed user.
Query using database Join
Une opération Join prend au moins deux tables et trouve toutes les combinaisons de lignes qui satisfont une condition donnée. Le résultat qui est une combinaison de lignes est inséré dans une table temporaire.
L’exemple suivant montre ce méchanisme dans le contexte de l’implémentation d’une fonctionnalité follow: Un user ne veut afficher que les postes des gens qu’il follow.
users table
| id | username |
|---|---|
| 1 | john |
| 2 | susan |
| 3 | david |
posts table
| id | author_id | body |
|---|---|---|
| 1 | 2 | Blog post by susan |
| 2 | 1 | Blog post by john |
| 3 | 3 | Blog post by david |
| 4 | 1 | Second blog post by john |
La table suivante montre qui follow qui. On peut y voir que john follow david, susan follow john et david. david ne follow personne:
follows table
| follower_id | followed_id |
|---|---|
| 1 | 3 |
| 2 | 1 |
| 2 | 3 |
Pour obtenir la liste de posts follwed par l’utilisateur susan, les tables posts et follows douvent être combinées.
Premièrement, la table follows est filtrée pour n’en garder que les lignes qui ont susan comme follower, qui dans cet exemple sont les deux dernières lignes. Ensuite une table temporaire est créée pour toutes les combinaisons possibles de lignes dans posts et la version filtrée de follows en ne gardant que les posts qui apparaissent dans la liste d’users que susan follow. La table suivante montre le résulat de l’opération join. Les colones utilisées pour effectuer le join sont marquées avec un *
| id | author_id* | body | follower_id | followed_id* |
|---|---|---|---|---|
| 2 | 1 | Blog post by susan | 2 | 1 |
| 3 | 3 | Blog post by david | 2 | 3 |
| 4 | 1 | Second blog post by john | 2 | 1 |
Cette table contient donc uniquement les posts écrits (authored) par les users que susan suit. Le query Flask-SQLAlchemy qui execute ce join mot à mot tel que décrit précédament est relativement complexe:
return db.session.query(Post).select_from(Follow). \
    filter_by(followers_id=self.if). \
    join(Post, Follow.followed_id == Post.author_id)
Contrairement aux requètes habituelles qui commencent par query l’atribut du model qui est query, le format que nous utilisons ici ne s’y prète pas. Ce query a besoin de retourner les lignes de posts mais la première opération qui doit être faite est l’application d’un filtre à la table follows.
db.session.query(Post)spécifie qu’il s’agit d’un query qui retournera des objets de typePostselect_from(Follows)dit que ce query commence dansFollowfilter_by(follower_id=self.id)effectue le filtrage de la tablefollowspar l’utilisateur quifollow.join(Post, Follow.followed_id == Post.author_id)join les résultats defilter_by()avec les objetsPost
Le query peut être simplifié en échangeant filtre avec join:
return Post.query.join(Follow, Follow.followed_id == Post.author_id) \
.filter(Follow.follower_id == self.id)
En débutant avec l’opération join, le query peut commencer à Post.query et donc maintenant les deux filtres qu’il reste à appliquer sont join() et filtre(). Cette opération est équivalente à la précédente.