Interface graphique Tkinter Python
Directory
Sources
En bref
- Import Tkinter module
- Creation de la main window de notre GUI
- Ajouter des widgets à la GUI
- Ajouter le main event loop
Widgets
- button
- canvas
- checkbutton
- combobox
- entry
- frame
- label
- labelframe
- listbox
- menu
- menubutton
- message
- notebook
- tk_optionMenu
- panedwindow
- progressbar
- radiobutton
- scale
- scrollbar
- separator
- sizegrip
- spinbox
- text
- treeview
top-level windows
tk_chooseColor$ \Rightarrow $ pops up a dialog box for the user to select a color.tk_chooseDirectory$ \Rightarrow $ pops up a dialog box for the user to select a directory.tk_dialog$ \Rightarrow $ creates a modal dialog and waits for a response.tk_getOpenFile$ \Rightarrow $ pops up a dialog box for the user to select a file to open.tk_getSaveFile$ \Rightarrow $ pops up a dialog box for the user to select a file to save.tk_messageBox$ \Rightarrow $ pops up a message window and waits for a user response.tk_popup$ \Rightarrow $ posts a popup menu.toplevel$ \Rightarrow $ creates and manipulates toplevel widgets.
geometry managers
- place $ \Rightarrow $ which positions widgets at absolute locations
- grid $ \Rightarrow $ which arranges widgets in a grid
- pack $ \Rightarrow $ which packs widgets into a cavity
Hello world
import tkinter as tk

win = tk.Tk()
label = tk.Label(win, text="Hello World")
label.pack()

win.mainloop()
Widgets
Pour créer un logiciel graphique, on ajoute dans une fenêtre des éléments graphiques que l’on nomme widget. Ce widget peut être tout aussi bien une liste déroulante que du texte.
Boutons
Ils permettent de proposer une action à l’utilisateur. Dans l’exemple qui suit, on lui propose de fermer la fenêtre.
button = tk.Button(win, text="Close", command=win.quit)
button.pack()
Labels
Ce sont des espacess prévus pour écrire du texte. Les labels servent souvent à décrire un widget comme un input.
lab = tk.Label(win, text="Texte par defaut", bg="yellow")
lab.pack()
User input
value = tk.StringVar()
value.set("Texte par defaut")
entree = tk.Entry(win, textvariable=value, width=30)
entree.pack()
Check button
button = tk.Checkbutton(win, text="Nouveau?")
button.pack()
Button radio
Ce sont des cases à cocher qui sont dans un groupe et dans ce groupe seul un élément peut être sélectionné.
value = tk.StringVar()
b1 = tk.Radiobutton(win, text="Oui", variable=value, value=1)
b2 = tk.Radiobutton(win, text="Non", variable=value, value=2)
b3 = tk.Radiobutton(win, text="Poule", variable=value, value=3)

b1.pack()
b2.pack()
b3.pack()
Listes
Permettent de récupérer une valeur sélectionnée par l’utilisateur
liste = tk.Listbox(win)
liste.insert(1, "Python")
liste.insert(2, "PHP")
liste.insert(3, "jQuery")
liste.insert(4, "CSS")
liste.insert(5, "Javascript")

liste.pack()

win.mainloop()
Canvas
Espace dans lequel on peut dessiner ou écrire
canvas = tk.Canvas(win, width=150, height=120, background="yellow")
ligne1 = canvas.create_line(75, 0, 75, 120)
ligne2 = canvas.create_line(0, 60, 150, 60)

txt = canvas.create_text(75, 60, text="Poule", font="Arial 16 italic", fill="blue")

canvas.pack()
Autre éléments graphiques
create_arc() $ \Rightarrow $ arc de cercle
create_bitmap() $ \Rightarrow $ bitmap
create_image() $ \Rightarrow $ image
create_line() $ \Rightarrow $ ligne
create_oval() $ \Rightarrow $ ovale
create_polygon() $ \Rightarrow $ polygone
create_rectangle() $ \Rightarrow $ rectangle
create_text() $ \Rightarrow $ texte
create_window() $ \Rightarrow $ fenetre
Changer les coordonnées d’un élement crée dans le canvas
Via la méthode coords
canvas.coords(élément, x0, y0, x1, y1)
Supprimer un élément
Via méthode delete
canvas.delete(élément)
Scale
Ce widget permet de récupérer une valeur numérique via un scroll
value = tk.DoubleVar()
scale = tk.Scale(win, variable=value)

scale.pack()
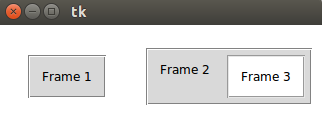
Frames
Ce sont des conteneurs qui permettent de séparer les éléments
import tkinter as tk

win = tk.Tk()

win['bg'] = 'white'

# frame 1
f1 = tk.Frame(win, borderwidth=2, relief="groove")
f1.pack(side="left", padx=30, pady=30)

# frame 2
f2 = tk.Frame(win, borderwidth=2, relief="groove")
f2.pack(side="right", padx=5, pady=5)

# frame 3
f3 = tk.Frame(f2, bg="white", borderwidth=2, relief="groove")
f3.pack(side="right", padx=5, pady=5)

# ajout de labels

tk.Label(f1, text="Frame 1").pack(padx=10, pady=10)
tk.Label(f2, text="Frame 2").pack(padx=10, pady=10)
tk.Label(f3, text="Frame 3", bg="white").pack(padx=10, pady=10)

win.mainloop()
PanedWindow
C’est un conteneur qui peut contenir autant de panneaux que nécessaire disposé horizontalement ou verticalement
p = tk.PanedWindow(win, orient='horizontal')
p.pack(side='top', expand='y', fill='both', pady=2, padx=2)
p.add(tk.Label(p, text='Volet1', background='green', anchor='center'))
p.add(tk.Label(p, text='Volet2', background='blue', anchor='center'))
p.add(tk.Label(p, text='Volet3', background='red', anchor='center'))

p.pack()
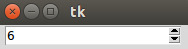
Spinbox
Propose a l’utilisateur de choisir un nombre
s = tk.Spinbox(win, from_=0, to=10)
s.pack()
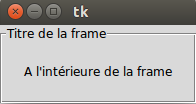
LabelFrame
Cadre avec un label
l = tk.LabelFrame(win, text="Titre frame", padx=20, pady=20)
l.pack(fill='both', expand='yes')

tk.Label(l, text="A l'interieur de la frame").pack()
Alertes
import tkinter as tk
import tkinter.messagebox as mb


def callback():
    if mb.askyesno('Titre 1', 'Êtes-vous sûr de vouloir faire ça?'):
        mb.showwarning('Titre 2', 'Ok...')
    else:
        mb.showinfo('Titre 3', 'Bouh!')
        mb.showerror('Titre 4', 'Aha')


win = tk.Tk()

tk.Button(text='Action', command=callback).pack()

win.mainloop()
Autres alertes
showinfo()showwarning()showerror()askquestion()askokcancel()askyesno()askretrycancel()
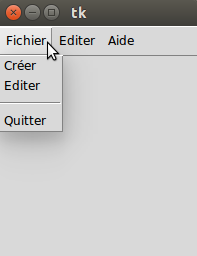
Barre de menu
import tkinter as tk
import tkinter.messagebox as mb


def alert():
    mb.showinfo("Alerte", "Bravo!")


win = tk.Tk()
menubar = tk.Menu(win)

menu1 = tk.Menu(menubar, tearoff=0)
menu1.add_command(label="Créer", command=alert)
menu1.add_command(label="Editer", command=alert)
menu1.add_separator()
menu1.add_command(label="Quitter", command=win.quit)
menubar.add_cascade(label="Fichier", menu=menu1)

menu2 = tk.Menu(menubar, tearoff=0)
menu2.add_command(label="Couper", command=alert)
menu2.add_command(label="Copier", command=alert)
menu2.add_command(label="Coller", command=alert)
menubar.add_cascade(label="Editer", menu=menu2)

menu3 = tk.Menu(menubar, tearoff=0)
menu3.add_command(label="A propos", command=alert)
menubar.add_cascade(label="Aide", menu=menu3)

win.config(menu=menubar)

win.mainloop()
Toutes les méthodes/options d’un widget
print(dir(tk.Button()))

for i in dir(tk.Button()):
    print(i)
Placer des widget
Via le paramètre side:
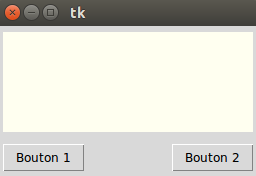
Exemple 1:
import tkinter as tk

win = tk.Tk()

tk.Canvas(
    win, width=250, height=100, bg='ivory').pack(
        side='top', padx=5, pady=5)
tk.Button(win, text='Button 1').pack(side='left', padx=5, pady=5)
tk.Button(win, text='Button 2').pack(side='right', padx=5, pady=5)

win.mainloop()
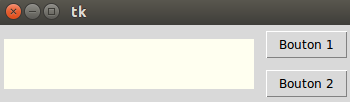
Exemple 2:
import tkinter as tk

win = tk.Tk()

tk.Canvas(
    win, width=250, height=50, bg='ivory').pack(
        side='left', padx=5, pady=5)

tk.Button(win, text='Button 1').pack(side='top', padx=5, pady=5)
tk.Button(win, text='Button 2').pack(side='bottom', padx=5, pady=5)

win.mainloop()
Paramètres
Unités de dimensions
Si on indique une unité via un int l’unité par défaut est pixel. Il existe d’autres unités:
i$ \Rightarrow $ poucesm$ \Rightarrow $ millimètresc$ \Rightarrow $ centimètres
Options de dimension
height $ \Rightarrow $ Hauteur du widget.
width $ \Rightarrow $ Largeur du widget.
padx, pady $ \Rightarrow $ Espace supplémentaire autour du widget. X pour horizontal et V pour vertical.
borderwidth $ \Rightarrow $ Taille de la bordure.
highlightthickness $ \Rightarrow $ Largeur du rectangle lorsque le widget a le focus.
selectborderwidth $ \Rightarrow $ Largeur de la bordure tridimensionnel autour du widget sélectionné.
wraplength $ \Rightarrow $ Nombre de ligne maximum pour les widget en mode “word wrapping”.
Options de couleurs
Il est possible d’indiquer une valeur de couleur par son nom en anglais:
"white""black""yellow"- …
Ou par son code hexadécimal.
background (ou bg)$ \Rightarrow $ couleur de fond du widget.foreground (ou fg)$ \Rightarrow $ couleur de premier plan du widget.activebackground$ \Rightarrow $ couleur de fond du widget lorsque celui-ci est actif.activeForeground$ \Rightarrow $ couleur de premier plan du widget lorsque le widget est actif.disabledForeground$ \Rightarrow $ couleur de premier plan du widget lorsque le widget est désactivé.highlightbackground$ \Rightarrow $ Couleur de fond de la région de surbrillance lorsque le widget a le focus.highlightcolor$ \Rightarrow $ couleur de premier plan de la région en surbrillance lorsque le widget a le focus.selectbackground$ \Rightarrow $ Couleur de fond pour les éléments sélectionnés.selectforeground$ \Rightarrow $ couleur de premier plan pour les éléments sélectionnés.
Curseur
Il est possible de changer l’apparance du curseur:
Button(fenetre, text ="arrow", relief="raised", cursor="arrow").pack()Button(fenetre, text ="circle", relief="raised", cursor="circle").pack()Button(fenetre, text ="clock", relief="raised", cursor="clock").pack()Button(fenetre, text ="cross", relief="raised", cursor="cross").pack()Button(fenetre, text ="dotbox", relief="raised", cursor="dotbox").pack()Button(fenetre, text ="exchange", relief="raised", cursor="exchange").pack()Button(fenetre, text ="fleur", relief="raised", cursor="fleur").pack()Button(fenetre, text ="heart", relief="raised", cursor="heart").pack()Button(fenetre, text ="man", relief="raised", cursor="man").pack()Button(fenetre, text ="mouse", relief="raised", cursor="mouse").pack()Button(fenetre, text ="pirate", relief="raised", cursor="pirate").pack()Button(fenetre, text ="plus", relief="raised", cursor="plus").pack()Button(fenetre, text ="shuttle", relief="raised", cursor="shuttle").pack()Button(fenetre, text ="sizing", relief="raised", cursor="sizing").pack()Button(fenetre, text ="spider", relief="raised", cursor="spider").pack()Button(fenetre, text ="spraycan", relief="raised", cursor="spraycan").pack()Button(fenetre, text ="star", relief="raised", cursor="star").pack()Button(fenetre, text ="target", relief="raised", cursor="target").pack()Button(fenetre, text ="tcross", relief="raised", cursor="tcross").pack()Button(fenetre, text ="trek", relief="raised", cursor="trek").pack()Button(fenetre, text ="watch", relief="raised", cursor="watch").pack()
Relief
b1 = Button(fenetre, text =”FLAT”, relief=’flat’).pack() b2 = Button(fenetre, text =”RAISED”, relief=’raised’).pack() b3 = Button(fenetre, text =”SUNKEN”, relief=’sunken’).pack() b4 = Button(fenetre, text =”GROOVE”, relief=’groove’).pack() b5 = Button(fenetre, text =”RIDGE”, relief=’ridge’).pack()
Grid
Placement des éléments sous forme de grille
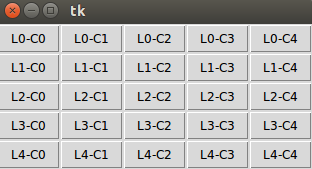
Exemple1:
import tkinter as tk

win = tk.Tk()

for ligne in range(5):
    for colonne in range(5):
        tk.Button(
            win, text='L{}-C{}'.format(ligne, colonne), borderwidth=1).grid(
                row=ligne, column=colonne)

win.mainloop()
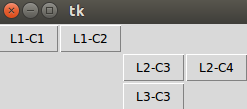
Exemple2:
import tkinter as tk

win = tk.Tk()

tk.Button(win, text='L1-c1', borderwidth=1).grid(row=1, column=1)
tk.Button(win, text='L1-c2', borderwidth=1).grid(row=1, column=2)
tk.Button(win, text='L2-c3', borderwidth=1).grid(row=2, column=3)
tk.Button(win, text='L2-c4', borderwidth=1).grid(row=2, column=4)
tk.Button(win, text='L3-c3', borderwidth=1).grid(row=3, column=3)

win.mainloop()
Exemples
Intégrer une image
import tkinter as tk

win = tk.Tk()

photo = tk.PhotoImage(
    file='test.png')

canvas = tk.Canvas(win, width=350, height=200)
canvas.create_image(0, 0, anchor='NW', image=photo)
canvas.pack()

win.mainloop()
Récuperer la valeur d’un user input
import tkinter as tk
import tkinter.messagebox as mb

win = tk.Tk()

def user_input():
    mb.showinfo("Alerte!", entree.get())

value = tk.StringVar()
value.set("valeur")

entree = tk.Entry(win, textvariable=value, width=30)
entree.pack()

button = tk.Button(win, text='valider', command=user_input)
button.pack()

win.mainloop()
Récuperer une image et l’afficher
Nécéssite l’import de tkinter.filedialog
import tkinter as tk
import tkinter.filedialog as fd

win = tk.Tk()

filepath = fd.askopenfilenames(
    title="Ouvrir une image",
    filetypes=[('png files', 'png'), ('all files', '.*')])

photo = tk.PhotoImage(file=filepath)
canvas = tk.Canvas(
    win, width=photo.width(), height=photo.height(), bg='light gray')

canvas.create_image(0, 0, anchor="NW", image=photo)
canvas.pack()


win.mainloop()
Récupérer un fichier text et l’afficher
import tkinter as tk
import tkinter.filedialog as fd

win = tk.Tk()

filename = fd.askopenfilename(
    title="Ouvrir votre document",
    filetypes=[('txt files', '.txt'), ('all files', '.*')])
fichier = open(filename, "r")
content = fichier.read()
fichier.close()

tk.Label(fenetre, text=content).pack(padx=10, pady=10)


win.mainloop()